How to use Group in Cricut Design Space
The tools in Cricut Design Space are very powerful and when used properly, they will make a major impact on our projects.
In this post I will be discussing how to Group in Cricut Design Space because I believe it's the underdog.
In this post I will be discussing how to use Group in Design Space. If you want a better understanding of how this tool works then continue reading. I’ve also gone over Attach, Slice, Contour, Weld and Flatten in detail so check those out too so you can get a complete understanding of how to master the tools in Cricut Design Space. These are mostly videos so it's a quick tutorial to get through.
Right out the gate I'm going to say the tools in Cricut Design Space can be really frustrating and Group is no exception. So before i even get into what is Group and all of that jazz, let me share 5 benefits of Group with you that are going to make using Design Space a little less annoying. You can decide if you want to continue reading after this.
When you Group in Cricut Design Space, you can
- put any text, image or layer in a Group or you use a combination of these
- change the colour of each element in the Group all at the same time. No need to go image by image
- hide all images, text or layers in the group at the same time
- duplicate everything in the Group at the same time
- changes the line type of everything in the Group at the same time
What is Group in Cricut Design Space?
When you Group in Cricut Design Space, you're able to move and resize different images, layers or text. This is amazing because you can make changes to multiple elements in one shot as opposed to image by image. You can also hide all the elements of your design all at the same time too. For example, let's say you're working with 3 ice-cream cones. You have the option to resize each separately however, if you Group them, you can resize and move them all at the same time.
Watch this video on how to use Group in Cricut Design Space
Isn't Group the same thing as Attach?
If you don't remember anything from this post remember this, Group works on the canvas and Attach works on the cutting mat. Now you are probably wondering what I mean by this so let me explain.
When you Group, you're making it easier to move and resize different images, layers or text in one shot. Attach works the very same way on the canvas in some aspect. It will keep your design together on the canvas however there is one big difference. Read more about Attach right here because there are other difference I haven't discussed in this post.
When you Group your design, once you send it to the cutting mat, the design will be rearranged and your letters will be jumbled. Group has no effect on the cutting mat. On the other hand, when you attach your design and send it to the cutting mat, your design will hold its place and your letters will be properly arranged.
Once you send your design to the cutting mat, Group doesn't work anymore and Attach starts to work. Therefore, Group works on the Canvas and Attach works on the cutting mat.
How to Group in Cricut Design Space
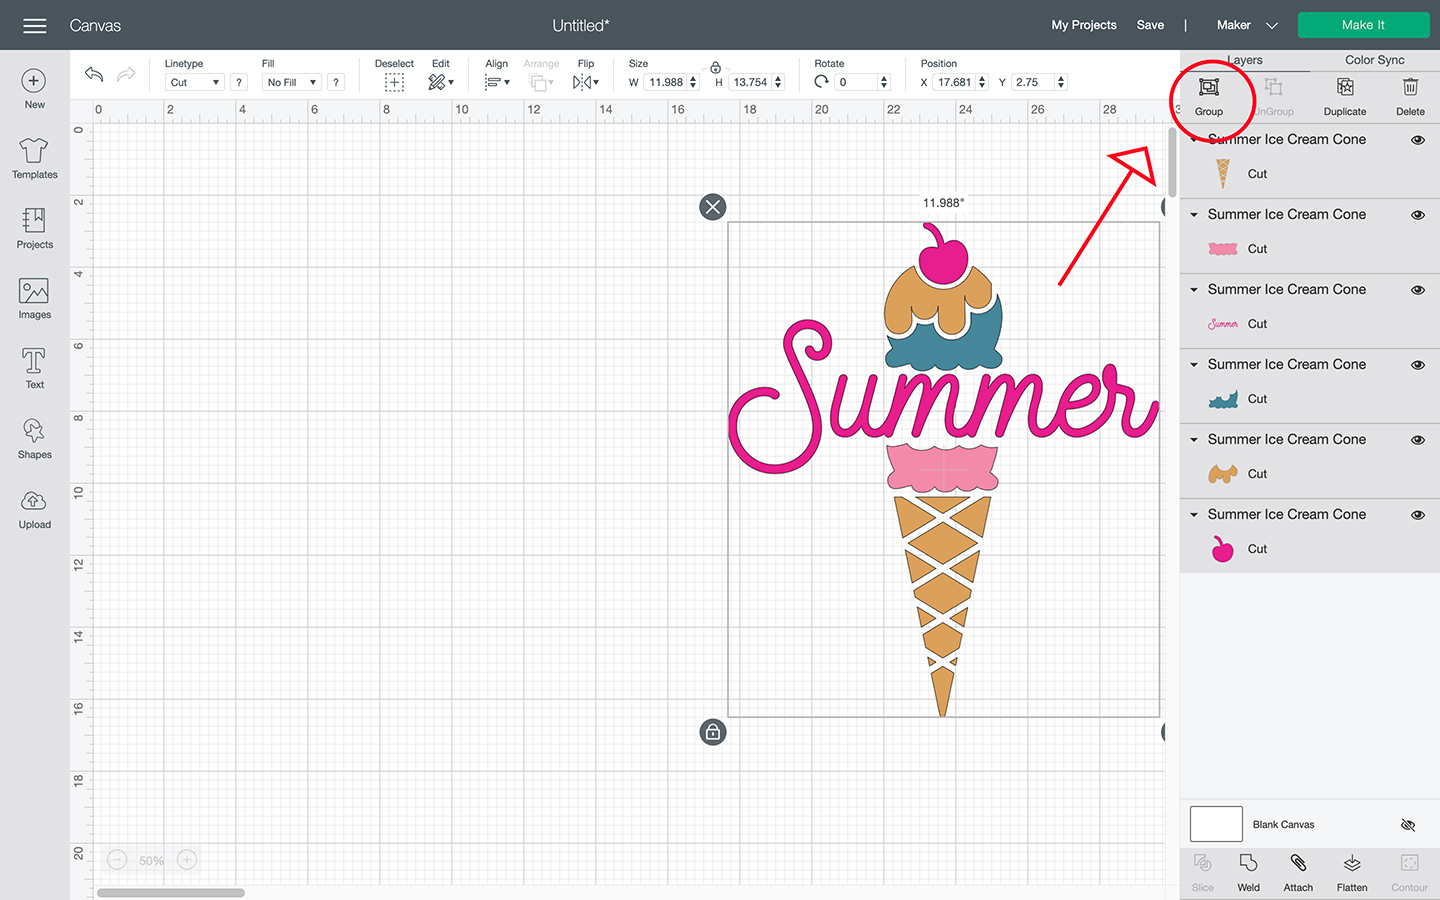
To Group a design, simply select the images, layers or text you want to Group and then click Group which is located at the top of the layers panel. It's really that simple.
If you select an image from Cricut Design Space, it will automatically be Grouped when it comes on the canvas. The same thing goes for text too. From my experience, when I buy an SVG, the layers are usually already Grouped when I upload the image to Cricut Design Space.

How to Ungroup in Cricut Design Space
It's important to talk about Ungroup too because as I mentioned above, some designs are already Grouped when they are in Cricut Design Space so if you want to work with the different layers, you will need to Ungroup.
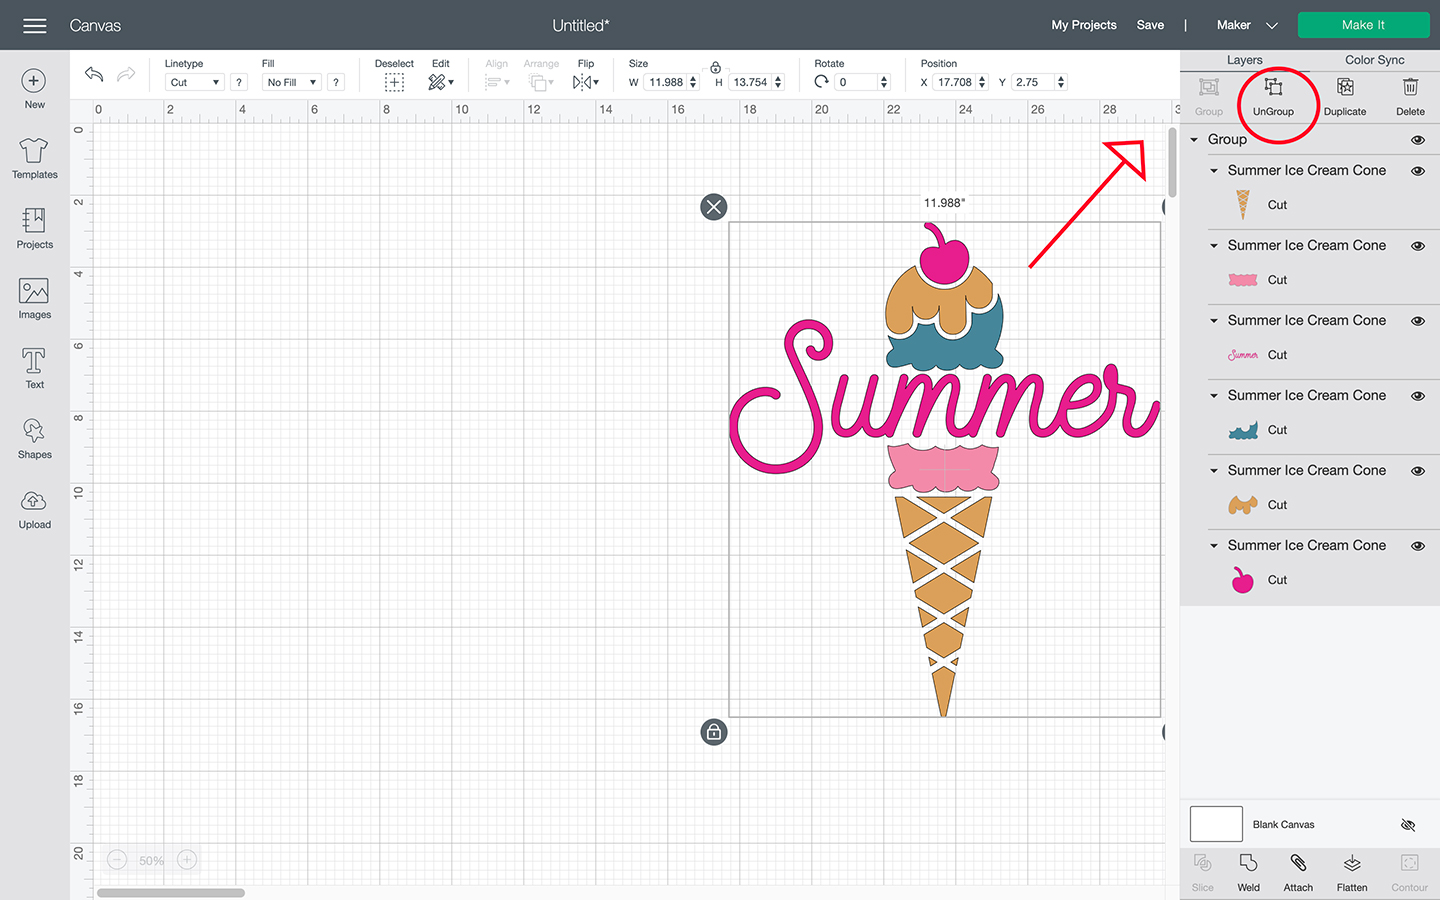
To Ungroup a design, select the design and click Ungroup at the top of the layers panel.

How to Group and Ungroup text in Cricut Design Space
This section is dedicated to Group and Ungrouping text because I think it deserves some attention. In Cricut, there are usually more than one ways to do the same thing. You can Group text by simply clicking Group located on the layers panel. On the other hand, we can Ungroup more than one ways. In this section we will be discussing the Advanced option and how to use it to Ungroup.
How to Group text:
To Group text, select it then click Group at the top of the layers panel (see the image above).
How to Ungroup text:
To Ungroup text, go back to the same layers panel (as show above) and simply click Ungroup.
To use the Advanced option to Ungroup text, follow these steps:
In Cricut Design Space:
- Select the text
- Navigate to the Toolbar at the top of the page
- Choose the Advanced option.
- Choose one of the 3 options from the dropdown
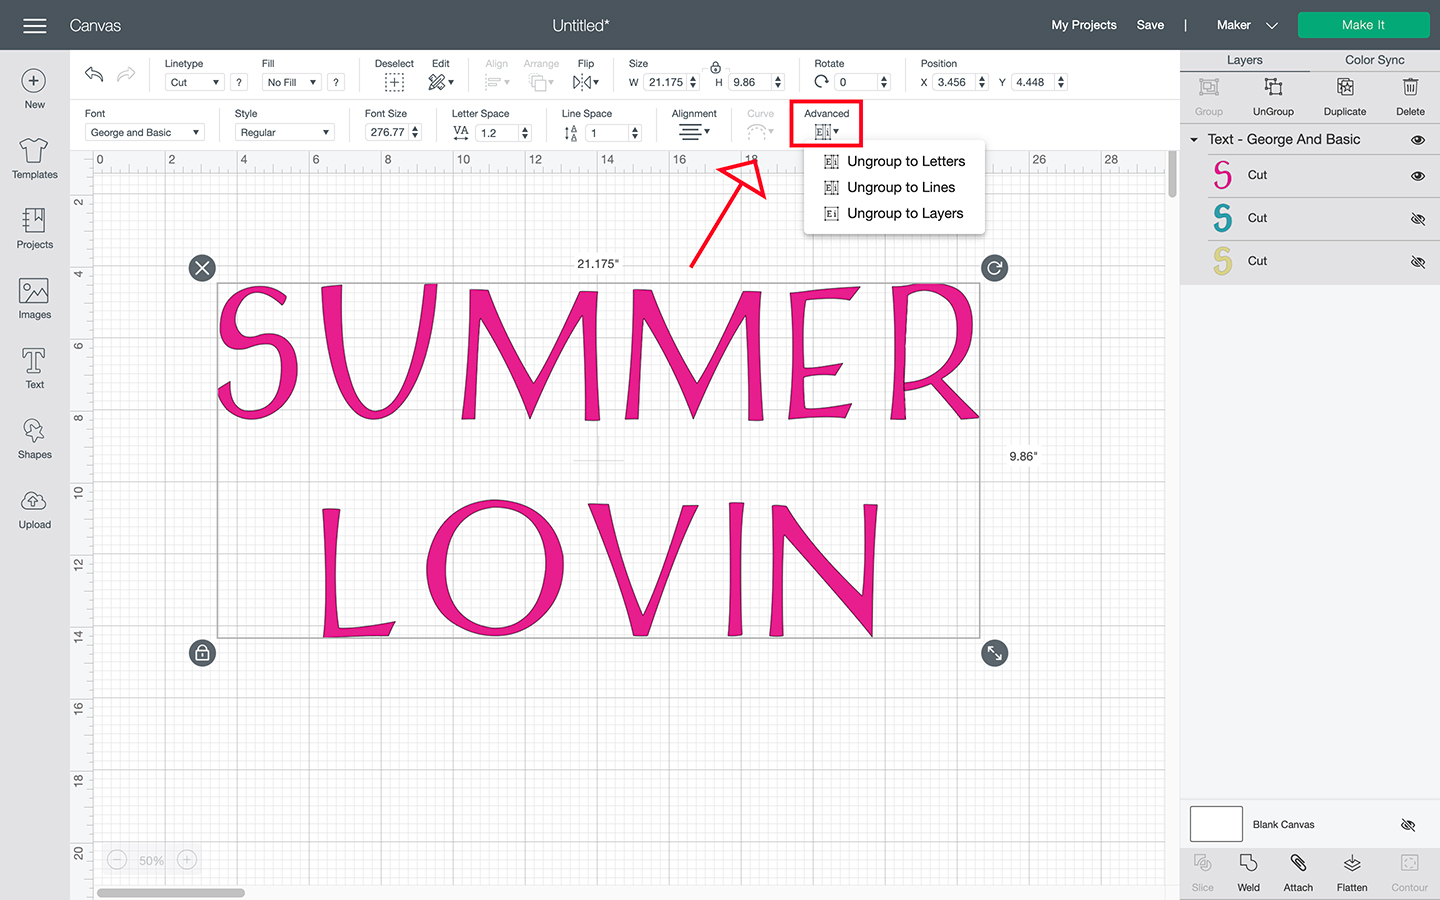
When you select this option, you will have see 3 options (see below). I will go through each separately.

Ungroup to Letters
- If you type the word “Summer” in Cricut Design Space and you want to individually manipulate each letter, this is the option to use. This option allows you to work letter by letter rather than with the entire word “Summer”.
Ungroup to Lines
- This option is great if you are working with text on separate lines and you want to manipulate a certain line within that text. For example, “Summer Lovin” is made up of 2 lines of text . By selecting Ungroup to Lines, you are able to manipulate Lines 1 which is “Summer” or Line 2 which is “Lovin”.
Ungroup to Layers
- Use this option if you are working with one of Cricut's multi-layer font. If you are using a multi-layer font and you don't want to use every layer in your design, this is the option to use. Just note that multi-layer font is the only option that Ungroup to Layers works with. It doesn't work with multi-layer images or multi-layer text. George and Basic is a multi-layer font in Cricut Design Space.
Why use Group in Cricut Design Space
Group is important because it will make your life so much easier and it allows you to get granular with your design.
You can ungroup to layers and simply work with the layer you're interested in or you can ungroup to letters and fix each letter the way you want (this will come in handy for cake toppers).
And nobody wants to resize image by image especially when you want to create a uniform look or when you want to maintain proportion between different images so Group is pretty important.
Summary
Grouping in Cricut Design Space is important because it allows us to manipulate more than one images, text and layers at the same time rather than on an image by image basis. We've also learned that whatever we Group, we can Ungroup. Knowing how to use Group in Cricut Design Space brings you once step closer to really getting to know how to use our Cricut machine. And remember, Group holds our project together on the canvas but once we send it to the cutting mat, Attach is the feature that holds everything in place on the mat.
WANT TO REMEMBER THIS POST ABOUT HOW TO USE GROUP IN CRICUT DESIGN SPACE? SAVE THIS PIN TO YOUR PINTEREST BOARD!


You explain things very well. Thank you.
Thank you!!