Acrylic Christmas Ornaments

This post may contain affiliate links, which means if you click and make a purchase through my link, I make a small commission at no cost to you. See my Disclosure Policy for more information.

Acrylic christmas Ornament, DIY Ornament, Christmas DIY

Learn how to diy acrylic ornaments using vinyl. They are perfect for recording moments such as first Christmas and first home.  They will also have your tree looking glam and sparkly.

If you love DIY ornaments as much as I do, these Acrylic Christmas Ornaments are a must this year. Personalized ornaments are one of my favourite Christmas DIYs because there are no rules. They are easy to make and fun to decorate which pretty much sums up the perfect DIY. Quite frankly, if you mess up, chances are no one will notice because of the unique qualities of each ornament.

Last year was my first time making personalized ornaments and your girl was feeling herself! I used the traditional globe ornament and they came out really good. It was my first time personalizing ornaments so I was really proud of myself. I even made a few ornaments for my friends and my family. Check it out here.

This year I decided to personalize Christmas ornaments again however I wanted to try something different.  To make this year's ornaments, I decided to purchase clear round acrylic blocks.  I’ve been seeing this style of ornament on the web and I really love the idea. The ones that I purchased are laser cut to mimic the shape of an ornament so they are super cute.

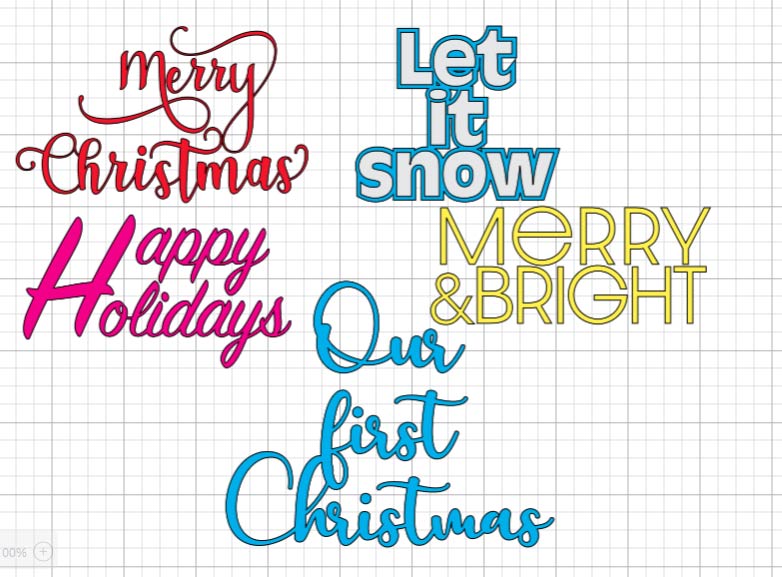
These acrylic ornaments also give me a sleek elegant vibe so this year I know these will definitely make an appearance in a few of the gifts I’m giving to family. I designed the SVGs used in this post and they are available for free in my resource library so head over there to download your copy. The password to the resource library is in the form available at the bottom of this post.

I’ve included a PDF version if you prefer to cut these designs by hand and a SVG version if you have a cutting machine which is what I use. I have the Cricut Maker.

Acrylic Christmas Ornaments materials:

1. Cricut Maker
2. Vinyl
3. Transfer tape
4. Blank Acrylic ornament
5. Get my free SVG Christmas Bundle from my Resource Library

Prepare Acrylic blank

To protect the Acrylic from getting scratched or chipped, the Etsy Shop I purchased these from actually shipped them with a protective film.  I think thats a genius idea because if you've worked with Acrylic before, you know how easily they smudged.
I removed the protective film from the side I plan to add the vinyl to and left the other side protected.  There's no reason to remove it now because I'm not adding anything to that side.  Plus as I mentioned before, I didn't want it to get scratched or smudged.
In the crafting world I know we usually clean our surfaces with alcohol before we add vinyl but I didn't use alcohol.  The protective film gave the acrylic blank an extra layer of protection so I didn't see a need to clean it.

Tips for cleaning:

These acrylic blanks are really easy to clean.  If you want to remove fingerprints etc. use a fine cloth to wipe these clean.  I used just a tad bit of water where necessary.

Upload your design

 If you already have a design to use for this project, go ahead and upload it to Cricut Design Space or whatever design software you use.  I designed a Christmas Phrase bundle which is ideal for this tutorial. If you want to use the SVG I used in this tutorial (hint: there are more than one SVGs included hence the word bundle) You can download my designs for free from my Resource Library.
When you open the designs in Design Space, the designs are all grouped together so go ahead and ungroup so you can work with each design individually.
The uploaded files should look like this:
Acrylic Christmas ornament, DIY Ornament, Christmas Ornament

Prepare vinyl and ribbon

My blanks are about 3 inches so in order to really be spot on with my sizing, I used shapes in Design Space to create a circle.  By creating a circle to work with I can play with the size as well as placement of the design. You definitely want to do this as well because you will end up wasting vinyl if you cut your design too big or whatever.
I made a cute little bow with about 18 inches of ribbon and then I used my hot glue to attach it to the blank. To be honest, I wanted to tie the bow around the acrylic ornament but I got the wrong size ribbon.  The size of my ribbon is 7/8 in x 8 yd (2.2cm x 7.3m). The width was too wide so every time I tied the ribbon around the ornament, it was just a mess.  Therefore, I decided to go with a cut bow and some hot glue.

Tips for ribbon:

Wired ribbon worked out surprising well for this project because it's easy to manipulate.  It goes wherever you put it and it stays there.
If you prefer to tie the ribbon around the acrylic ornament, get one with a smaller width.

Look at these beautiful ornaments


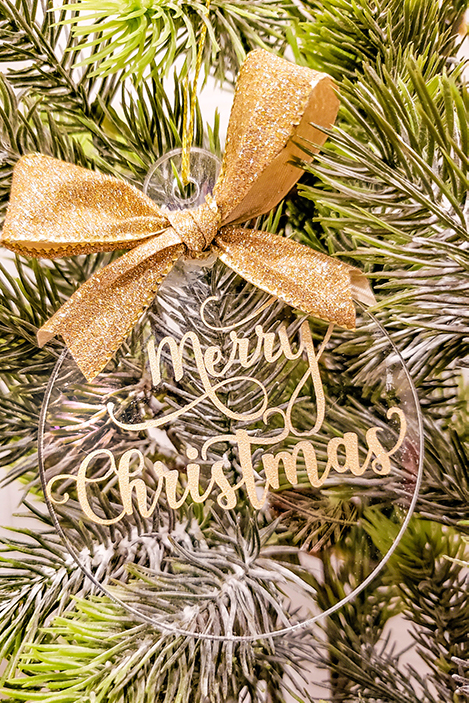
These ornaments are quickly becoming a favourite. I love the acrylic against the decor, it really elevates the entire look of the tree and gives it a glam feeling. loves it!

I want to hear about your experience with making Christmas ornaments.  Do you usually do a DIY and if so, what kind? Globe ornaments? Clay? Or do you use paper?

GRAB THE FREE SVGS  I USED IN THIS TUTORIAL. JUST FILL OUT THE FORM BELOW.

Leave a Reply

Your email address will not be published. Required fields are marked *

*